| CPC G05B 19/4155 (2013.01) [B23K 9/02 (2013.01); B23K 9/0953 (2013.01); B23K 9/0956 (2013.01); B23K 31/125 (2013.01); G05B 2219/45135 (2013.01)] | 12 Claims |

|
1. A method for automatically determining optimum welding parameters (Pi,opt) for carrying out a weld on a workpiece (4), comprising:
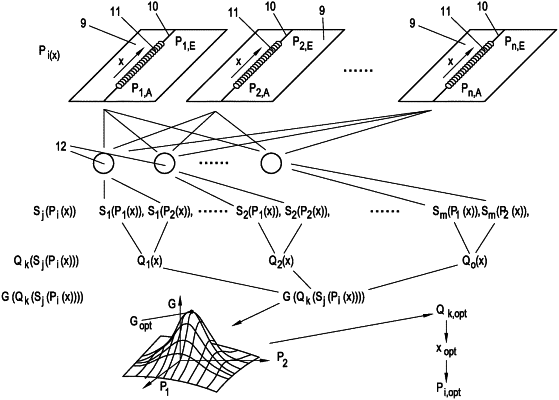
carrying out via a welding torch arranged on a process robot actuated by a control device a plurality of test welds on test workpieces (9) along test welding tracks (10), and automatically changing at each test weld at least one welding parameter (Pi(x)) along the test welding track (10) linearly or in specific stages along the test welding track (10) on a predefined length (l) from a predefined initial value (Pi,A) to a predefined final value (Pi,E), depending on the location (x), wherein each test weld is carried out along predefined test welding tracks (10) with a constant tangential vector (t);
measuring each resulting test weld seam (11) along the test welding track (10) during or after carrying out the plurality of test welds with at least one sensor (12), and receiving at least one sensor signal (Sj(Pi(x))), depending on the location (x) along the test weld seam (11);
processing the at least one sensor signal (Sj(Pi(x))) via the control device and depositing the at least one sensor signal (Sj(Pi(x))) so processed in a database;
calculating via the control device at least one quality parameter (Qk(Sj(Pi(x)))) which characterizes each weld seam (11) from the at least one sensor signal (Sj(Pi(x)));
calculating via the control device a quality functional (G(Qk(Sj(Pi(x))))) for characterizing the quality of the test weld seams (11) in accordance with the changed welding parameters (Pi(x)) from the at least one quality parameter (Qk(Sj(Pi(x)))); and
ascertaining via the control device an optimum of the quality functional (Gopt(Qk(Sj(Pi(x)))), and determining via the control device from this determined optimum of the quality functional (Gopt(Qk(Sj(Pi(x)))) the respective optima of the quality parameters (Qk,opt(Sj(Pi(x))), and from the optima of the quality parameters (Qk,opt(Sj(Pi(x))) from the sensor signals (Sj(Pi(x))) identifying via the control device those locations (x) as optimum locations (xopt) along the test weld seam (11) at which the welding result of the test weld is optimum according to the respective quality parameter (Qk(Sj(Pi(x))), and defining via the control device the welding parameters (Pi(x)) at these locations (xopt) of the test weld seams (11), identified as optimum, as values for the optimum welding parameters (Pi,opt) for carrying out the welding on the workpiece (4), and saving the values in the database; and
carrying out the welding of the workpiece using the values saved in the database.
|